DIY Inspiration Boards

Cork-Board-Ideas

I bet you have an old cork board somewhere in your home. If so, it is just screaming for this simple makeover! You can transform your cork board in under 30 min. for the cost of 1/2 yard of fabric and some thumb tacks:

Cork-Board-Ideas
This was such an easy project I made 3 of these to use as inspiration boards in my new office. It probably took me less than an hour total, but oh so much prettier than a plain cork board!
Cork-Board-Ideas
It was also a super inexpensive project because I recovered some cork boards I had found at Salvation Army for $2 a piece (thrift stores are a great source for these). I had already given the cork boards a DIY touch for our moving party, and wanted to transform them once again!
Cork-Board-Ideas
I can’t claim this as an original idea – I had seen several similar fabric covered cork boards on Pinterest earlier this year such as this helpful tutorial from Two Twenty One blog and this one from Enjoyer of Grace. However, I improvised on these tutorials by making a couple time saving shortcuts that I wanted to share.
Here’s how to transform your cork board in a matter of minutes!

Supplies for Fabric Inspiration Boards

  • An old cork board (thrift stores often have lots of these for $2-$3 a piece)
  • Pretty fabric (I used this upholstery weight fabric from The Needle Shop)
  • Thumb tacks (I used a little more than 1 box of 200 to make 3 cork boards)
  • Staple gun
Cork-Board-Ideas

How to Make a Fabric Inspiration Board

1. Cut out a piece of fabric with a couple inch allowance around each side of your cork board. Note, unless your fabric is really wrinkled it is not necessary to iron it in advance – any creases will be smoothed out when you stretch it across the board!


Cork-Board-Ideas

2. With the back side of the cork board facing up, fold over the sides of fabric and use the staple gun to put 1-2 staples on each side. Pull the fabric nice and taut while you are stapling:

Cork-Board-Ideas

3. Fold over the corners nicely and staple down:

Cork-Board-Ideas

Here’s what the backside looks like once stapled:

Cork-Board-Ideas

Here’s what it looks like when you turn it over:

Cork-Board-Ideas

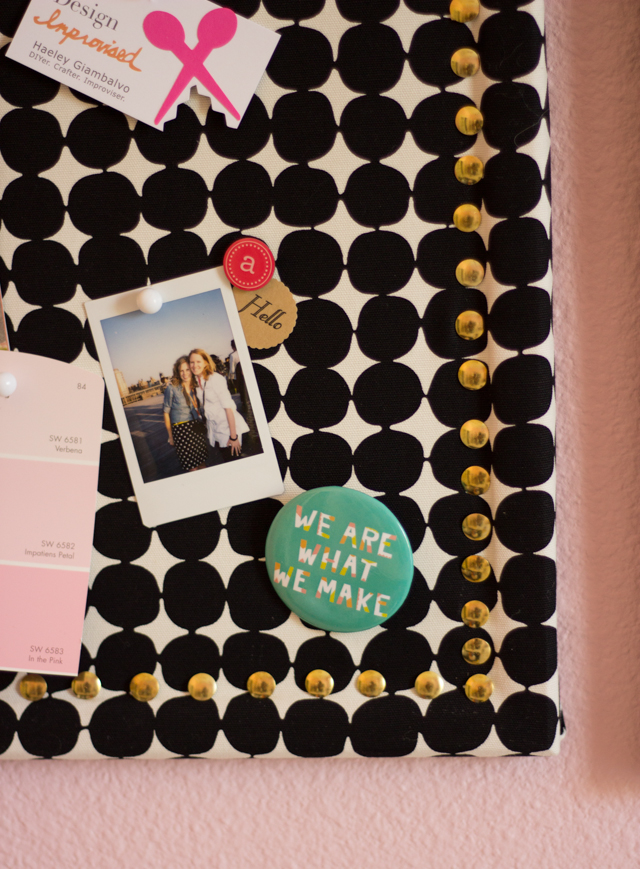
4. Now just take your thumb tacks and start pushing them in around the edge, right where the cork board meets the wood frame. To save time, I spaced the thumb tacks a little bit apart, just eyeballing the spacing as I went along and adjusting as needed. If you want, you can put the thumb tacks right next to each other, but that will take more time (and more thumb tacks!)

Cork-Board-Ideas

5. Hang on the wall and start pinning your favorite inspiration images, color swatches & photos!

Cork-Board-Ideas


Cork-Board-Ideas

Similar Posts

Leave a Reply

Your email address will not be published. Required fields are marked *