DIY Ribbon Wall: Tutorial
If you are looking for an easy backdrop for a party table or a photo booth at your next party, a DIY ribbon wall is the way to go!

I made this ribbon wall for my daughter’s ballerina birthday party with a few paper ballet slippers sprinkled in and some tuile draped from the sides

Supplies for DIY Ribbon Wall
- Twine
- Various ribbon and / or crepe paper streamers (you can be creative with the variety of textures and colors you use)
- Stapler
- Scissors
- (Optional for ballerina party) – DIY ballet slipper template and a couple yards of tuile

How to Make a Ribbon Wall
This approach to making a ribbon wall is really simple! Most ribbon walls I’ve seen have the ribbons tied at the top in a knot, but I found that stapling them was a lot easier.
1. Cut a piece of twine a couple feet longer than the length of the wall you want to cover with the ribbons (or you can wait to cut it until you are done adding ribbons and have the length just how you want it)
2. Cut a bunch of ribbons (or crepe paper streamers) to your desired length. The ribbons don’t all have to be the exact same length, and it even looks better if there is some variation. I just cut one, laid it out on the floor and measured another one along it.
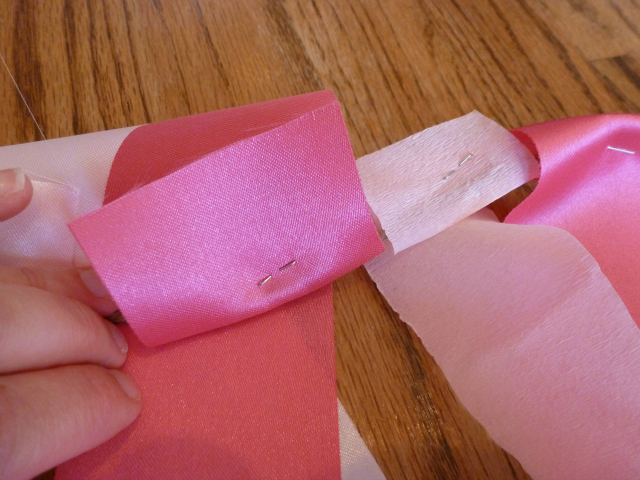
3. Start stapling the ribbons by folding the top 1 inch or so of the ribbon over the twine and stapling it together (don’t staple it directly to the twine, that way you can still slide them around and space them out as you like).
- Note: I randomly varied the order of colors and mix of ribbon vs. crepe paper throughout. You can get creative with what patterns you want to make with the ribbons.
4. Once you have a number of ribbons stapled on. Test out the length along your wall and decide if you need to add more. You may want to drape the string of ribbons as I did, or stretch it straight across the wall.
5. Cut the twine and affix to the wall using painters / masking tape. I used the tuile at the ends to cover up the tape.
And that’s it!